Imagine biting into a pillow‑soft slice that melts on your tongue, its sweet aroma filling the kitchen like a warm hug. Sweet Dreams Condensed Milk Bread captures that moment, turning an ordinary breakfast into a celebration of comfort.
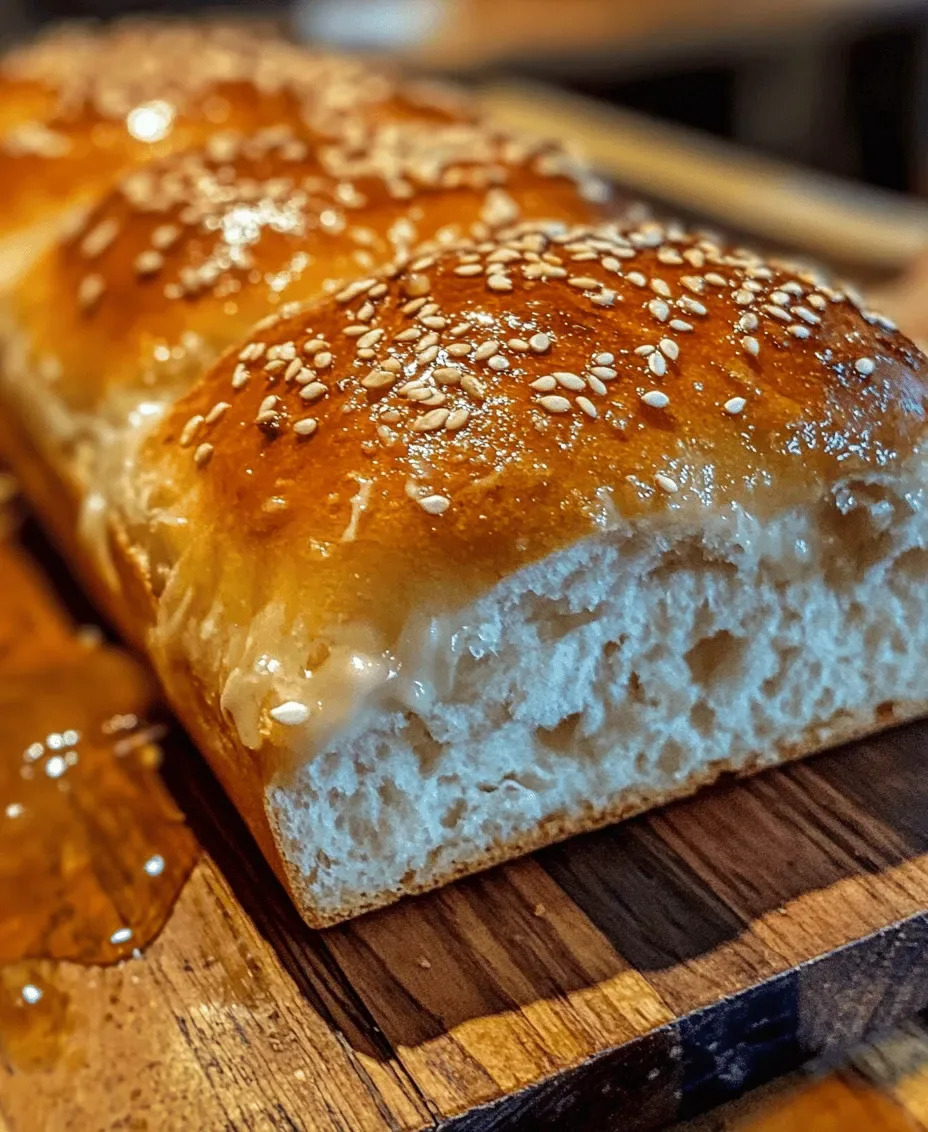
What makes this loaf truly special is the marriage of rich sweetened condensed milk with a buttery, yeasted dough that rises to a golden crown. The result is a tender crumb speckled with caramel‑kissed pockets, delivering a flavor that feels both nostalgic and indulgent.
This bread is perfect for anyone who craves a sweet start to the day—families gathering for brunch, coffee‑shop lovers seeking a treat, or anyone wanting a make‑ahead breakfast that stays fresh. Serve it warm with butter, jam, or a drizzle of honey for an extra touch of bliss.
The process is straightforward: you’ll whisk together a few pantry staples, knead the dough until smooth, let it rise, then bake until the top is a deep amber. A quick glaze of condensed milk added before baking creates a glossy, caramelized finish that makes every slice shine.
Why You'll Love This Recipe
Irresistibly Sweet: The condensed milk infuses the crumb with a mellow caramel sweetness that isn’t cloying, making each bite a gentle, lingering treat.
Simple Technique: No fancy equipment is needed; just a mixing bowl, a stand mixer (optional), and a standard loaf pan, so even beginners feel confident.
Make‑Ahead Friendly: The loaf stays soft for days, and it freezes beautifully, giving you a ready‑to‑toast breakfast anytime you crave it.
Versatile Serving: Enjoy it plain, toasted with butter, or paired with fresh fruit and yogurt for a balanced brunch that satisfies sweet cravings.
Ingredients
The magic of this bread lies in a few humble ingredients that work together to create a luxurious texture. Sweetened condensed milk adds moisture and a caramel‑like depth, while the yeast gives the loaf its airy rise. Butter and milk enrich the crumb, and a touch of vanilla rounds out the flavor profile. Together they produce a loaf that’s soft, fragrant, and perfectly sweet.
Dry Ingredients
- 3 ½ cups (440 g) all‑purpose flour
- 2 teaspoons instant yeast
- ½ teaspoon salt
Wet Ingredients
- 1 cup whole milk, warmed (110°F/43°C)
- ¼ cup unsalted butter, melted
- 1 cup sweetened condensed milk
- 1 large egg, lightly beaten
- 1 teaspoon pure vanilla extract
Glaze (Optional)
- ¼ cup sweetened condensed milk
- 1 tablespoon melted butter
The dry ingredients create the structural framework, while the wet mixture hydrates the flour and activates the yeast. The butter and condensed milk enrich the dough, giving it that signature tenderness and subtle caramel hue. Brushing the optional glaze on the loaf just before it finishes baking adds a glossy, sweet crust that makes each slice look as good as it tastes.
Step-by-Step Instructions
Activating the Yeast
Begin by pouring the warmed milk into a small bowl, then sprinkle the instant yeast over the surface. Let it sit for 5‑7 minutes until frothy. This brief proofing step ensures the yeast is alive and ready to give the dough a strong rise, resulting in a light, airy crumb.
Mixing the Dough
- Combine Wet Ingredients. In a large mixing bowl, whisk together the melted butter, sweetened condensed milk, beaten egg, vanilla extract, and the frothy yeast mixture. The mixture should appear smooth and slightly glossy, indicating the fats are fully emulsified.
- Incorporate Dry Ingredients. Gradually add the flour, salt, and any remaining yeast (if using active dry) to the wet mixture. Stir with a wooden spoon until a shaggy dough forms. This stage is crucial for hydrating the flour evenly.
- Knead Until Elastic. Turn the dough onto a lightly floured surface and knead for 8‑10 minutes, or use a stand mixer with a dough hook for 5 minutes on medium speed. The dough should become smooth, elastic, and pull away cleanly from the surface—a sign of proper gluten development.
- First Rise. Shape the dough into a ball, place it in a lightly oiled bowl, and cover with plastic wrap or a damp towel. Let it rise in a warm spot (around 80°F/27°C) for 1‑1½ hours, or until doubled in size. This rise builds flavor and volume.
Shaping & Baking
- Degas and Shape. Punch the risen dough gently to release excess gas, then shape it into a loaf by folding the edges toward the center and rolling tightly. Place the shaped loaf seam‑side down into a greased 9×5‑inch loaf pan.
- Second Rise. Cover the pan loosely with a clean kitchen towel and let the dough rise again for 30‑40 minutes, or until it crowns about ½‑inch above the rim of the pan. This final proof ensures a lofty interior.
- Apply Glaze. If you prefer a glossy top, whisk together the optional glaze ingredients and brush a thin layer over the surface just before baking. The glaze will caramelize, giving the crust a beautiful sheen.
- Bake to Perfection. Preheat the oven to 350°F (175°C). Bake the loaf for 30‑35 minutes, rotating halfway through for even browning. The top should turn deep golden‑brown and a tap on the bottom should sound hollow. An internal temperature of 190°F (88°C) confirms doneness.
- Cool Before Slicing. Remove the bread from the pan onto a wire rack and let it cool for at least 15 minutes. Cooling allows the crumb to set, preventing a gummy interior and preserving the delicate texture.
Tips & Tricks
Perfecting the Recipe
Temperature Control. Keep the milk at 110°F (43°C); hotter milk kills the yeast, while cooler milk slows the rise, affecting texture.
Gentle Kneading. Over‑kneading can make the crumb dense. Stop when the dough feels smooth and springs back lightly.
Cover During Rises. A damp towel prevents the surface from drying out, which would create a crust before baking.
Use a Thermometer. Checking the internal temperature (190°F) guarantees a perfectly baked loaf without over‑drying.
Flavor Enhancements
Add a tablespoon of orange zest to the wet mixture for a citrus lift, or stir in ½ cup toasted coconut flakes for texture. A pinch of ground cinnamon or cardamom deepens the sweet profile without overwhelming the delicate flavor.
Common Mistakes to Avoid
Skipping the second rise results in a dense loaf, while opening the oven door too early can cause the crust to collapse. Also, avoid using low‑fat milk; the butter and condensed milk provide essential richness that low‑fat alternatives cannot replace.
Pro Tips
Steam the Oven. Place a shallow pan of hot water on the lower rack during the first 10 minutes of baking to create a slightly crisp crust while keeping the interior moist.
Brush Mid‑Bake. Lightly brush the loaf with a mix of melted butter and condensed milk halfway through baking for an extra glossy finish.
Freeze in Slices. Once cooled, slice the bread and wrap each piece individually before freezing. This makes quick toast‑ready portions for busy mornings.
Use a Kitchen Scale. Measuring flour by weight (≈440 g) improves consistency, especially in humid kitchens where cup measurements can vary.
Variations
Ingredient Swaps
Swap whole milk for almond or oat milk for a dairy‑free version; the loaf will stay tender while gaining a subtle nutty note. Replace butter with coconut oil for a tropical twist, or use honey instead of condensed milk for a lighter sweetness.
Dietary Adjustments
For a gluten‑free loaf, use a blend of rice flour, tapioca starch, and xanthan gum (total 440 g). To make it vegan, substitute the egg with a “flax egg” (1 tbsp ground flax + 3 tbsp water) and use a plant‑based condensed milk alternative.
Serving Suggestions
Serve warm with a pat of butter and a drizzle of extra condensed milk for pure indulgence. Pair with fresh berries and a dollop of Greek yogurt for a balanced brunch, or toast and top with avocado for a sweet‑savory contrast.
Storage Info
Leftover Storage
Allow the loaf to cool completely, then wrap it tightly in plastic wrap followed by a layer of aluminum foil. Store in an airtight container in the refrigerator for up to 4 days. For longer keeping, slice, wrap each piece, and freeze for up to 3 months.
Reheating Instructions
Reheat slices in a preheated 350°F (175°C) oven for 8‑10 minutes, covering loosely with foil to prevent drying. For a quick fix, microwave a slice on medium power for 20‑30 seconds, adding a splash of milk to retain softness. Brush with a little extra condensed milk after reheating for renewed shine.
Frequently Asked Questions
This Sweet Dreams Condensed Milk Bread delivers a cloud‑like texture, a caramel‑kissed crust, and a gentle sweetness that makes every breakfast feel special. We’ve walked through ingredient selection, dough handling, and baking nuances, plus storage and creative twists, so you can master the loaf with confidence. Feel free to experiment with flavors, add-ins, or dietary swaps—cooking is your playground. Slice, toast, and savor the blissful comfort of homemade sweetness!


