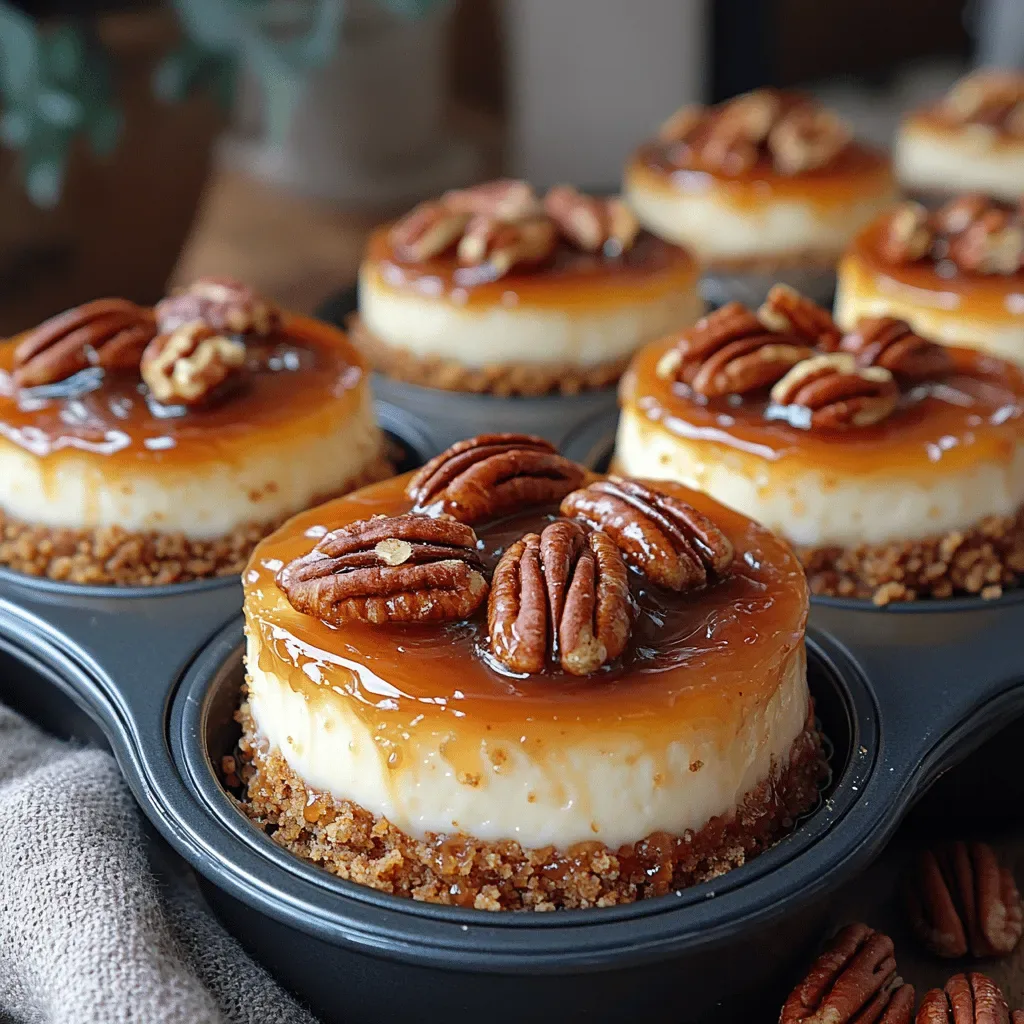
Imagine a bite‑sized masterpiece that captures the buttery crumble of a pecan pie crust, the silky richness of classic cheesecake, and the sweet, caramel‑kissed pecans on top—all in a single mini dessert. Mini Pecan Pie Cheesecakes turn that dream into reality, delivering a luxurious treat that feels both indulgent and perfectly portioned.
What makes this recipe truly special is the marriage of two beloved desserts: a buttery graham‑cracker crust infused with toasted pecans, and a velvety cheesecake layer flavored with a swirl of homemade pecan pie filling. The result is a harmonious contrast of textures—crunch, cream, and gooey caramel—all in one bite.
This dish is ideal for brunch tables, holiday breakfasts, or anytime you want to impress guests with a sophisticated sweet. It’s also a wonderful option for kids who love the familiar flavors of pecan pie but in a fun, handheld size.
The process is straightforward: prepare a crisp crust, blend a silky cheesecake filling, pour a luscious pecan pie mixture, bake until set, and finish with toasted pecans and caramel drizzle. In just under an hour, you’ll have a tray of elegant mini desserts ready to wow.
Why You'll Love This Recipe
Two‑in‑One Delight: You get the classic flavors of pecan pie and cheesecake in a single bite, eliminating the need to choose between desserts.
Portion‑Perfect: Mini sizes are easy to serve, control portions, and make for an attractive brunch spread without excess leftovers.
Simple Prep: With a few pantry staples and a single bake, even novice bakers can create a show‑stopping dessert.
Customizable Toppings: Add extra caramel, a dash of sea salt, or a drizzle of chocolate for endless flavor twists.
Ingredients
The foundation of these mini cheesecakes starts with a buttery graham‑cracker crust that’s enriched with finely chopped pecans for extra crunch. The filling blends full‑fat cream cheese with a silky pecan pie mixture, creating a custardy texture that holds its shape when sliced. Finally, toasted pecan halves and a quick caramel drizzle add the finishing touches that make each bite unforgettable.
Crust
- 1 ½ cups graham cracker crumbs
- ¼ cup finely chopped toasted pecans
- 3 tablespoons unsalted butter, melted
- 2 teaspoons granulated sugar
Cheesecake Filling
- 16 oz (2 packages) cream cheese, softened
- ½ cup brown sugar, packed
- 2 large eggs, room temperature
- 1 teaspoon pure vanilla extract
- ¾ cup pecan pie filling (store‑bought or homemade)
Topping & Finishing
- ¼ cup pecan halves, lightly toasted
- 2 tablespoons caramel sauce (store‑bought or homemade)
- Pinch of flaky sea salt (optional)
The graham‑cracker crust provides a buttery foundation that holds the creamy filling in place, while the chopped pecans add a nutty depth that echoes the topping. The cheesecake mixture, enriched with brown sugar and vanilla, balances the natural sweetness of the pecan pie swirl, creating a smooth, slightly caramel‑infused custard. Finally, toasted pecan halves give a satisfying crunch, and the caramel drizzle adds a glossy finish that makes each mini cheesecake look as good as it tastes.
Step-by-Step Instructions
Preparing the Crust
In a medium bowl, combine graham cracker crumbs, chopped toasted pecans, granulated sugar, and the melted unsalted butter. Stir until the mixture resembles wet sand. Press the blend firmly into the bottoms of a 12‑cup muffin tin, creating an even ¼‑inch layer. This step creates a sturdy base that won’t soggy when the filling bakes.
Mixing the Cheesecake Filling
Using a stand mixer or hand whisk, beat softened cream cheese on medium speed until smooth, about 2 minutes. Add brown sugar and continue beating until fully incorporated and the mixture is light in color. Beat in the eggs one at a time, scraping the bowl after each addition to avoid curdling. Finally, fold in vanilla extract and pecan pie filling until just combined—over‑mixing can cause cracks during baking.
Assembling and Baking
- Fill the Cups. Spoon the cheesecake batter over each crust, filling each cup about three‑quarters full. The batter should sit level with the rim for a tidy appearance.
- Water Bath (Optional). Place the muffin tin in a larger baking pan and pour hot water halfway up the sides of the tin. This gentle, moist heat helps prevent cracks and ensures even baking.
- Bake. Preheat the oven to 325°F (163°C). Bake for 18‑22 minutes, or until the edges are set and the centers still have a slight wobble—this guarantees a creamy interior.
- Cool Gradually. Turn off the oven, crack the door open, and let the cheesecakes sit for 10 minutes. Then remove from the water bath and cool on a wire rack to room temperature. This gradual cooling reduces the risk of cracks.
- Chill. Refrigerate the mini cheesecakes for at least 2 hours, preferably overnight, to allow the filling to fully set and the flavors to meld.
Finishing Touches
Before serving, sprinkle each cheesecake with a few toasted pecan halves, drizzle with caramel sauce, and add a pinch of flaky sea salt if desired. The caramel should coat the tops in a thin sheen, and the salt will accentuate the sweet‑nutty flavors. Serve chilled for the best texture.
Tips & Tricks
Perfecting the Recipe
Room‑Temperature Ingredients. Ensure cream cheese, eggs, and butter are at room temperature; this yields a smoother batter and eliminates lumps.
Don’t Over‑Mix. Once the pecan pie filling is added, mix just until incorporated to keep the texture light and prevent cracks.
Even Crust Layer. Use the bottom of a flat glass to press the crust firmly and uniformly for consistent bite‑size bases.
Flavor Enhancements
Add a splash of bourbon or dark rum to the pecan pie filling for a warm, adult‑friendly note. A drizzle of dark chocolate ganache over the caramel adds depth, while a sprinkle of cinnamon on the crust brings subtle spice.
Common Mistakes to Avoid
Skipping the water bath can lead to dry edges and cracks. Also, avoid baking at too high a temperature; the delicate filling needs gentle heat to stay creamy. Finally, don’t rush the chilling step—insufficient chilling results in a runny center.
Pro Tips
Use a Kitchen Scale. Weighing the crust ingredients ensures consistency, especially for the butter‑to‑crumb ratio.
Toast Pecans Fresh. Lightly toast pecans in a dry skillet for 3‑4 minutes until fragrant; this amplifies their buttery flavor.
Make Caramel Ahead. Prepare caramel sauce a day before; it thickens and develops richer flavor, then gently re‑heat before drizzling.
Serve on a Cold Plate. Chill the serving plates for a few minutes; this keeps the cheesecake firm longer during brunch service.
Variations
Ingredient Swaps
Replace the graham‑cracker crust with a ginger snap or vanilla wafer crumble for a spicier base. Swap the classic pecan pie filling for a maple‑walnut or caramel‑apple compote to change the flavor profile while keeping the same texture.
Dietary Adjustments
For a gluten‑free version, use gluten‑free graham crackers or almond flour in the crust. To make it dairy‑free, substitute cream cheese with a high‑fat coconut‑based cream cheese alternative and use coconut oil instead of butter.
Serving Suggestions
Pair the mini cheesecakes with a light citrus‑infused coffee or a sparkling mimosa. A dollop of whipped coconut cream on the side adds extra elegance, and a handful of fresh berries brings a bright, acidic contrast to the sweet nutty flavors.
Storage Info
Leftover Storage
Allow the cheesecakes to cool completely, then cover the muffin tin tightly with plastic wrap or transfer each piece to an airtight container. Store in the refrigerator for up to 4 days. For longer keeping, freeze the individual mini cheesecakes in a single layer on a baking sheet, then bag them; they’ll last up to 2 months.
Reheating Instructions
Reheat refrigerated leftovers in a 300°F (149°C) oven for 8‑10 minutes, covered with foil to retain moisture. If frozen, let them thaw overnight in the fridge, then follow the same oven reheating method. A quick microwave burst (10‑15 seconds) works for a single piece, but the texture is best preserved with gentle oven warming.
Frequently Asked Questions
Mini Pecan Pie Cheesecakes bring together the comforting flavors of two classic desserts in a perfectly portable size, making them ideal for brunch, holidays, or any special occasion. By following the detailed steps, using the tips provided, and experimenting with the suggested variations, you’ll create a crowd‑pleasing treat that looks as impressive as it tastes. Feel free to add your own twists, and enjoy every decadent bite!


