Imagine a sunrise on your plate that looks as vibrant as a summer market. Colorful Comfort: Easy Stuffed Bell Peppers brings that visual punch and a burst of breakfast flavor together in a single, hand‑held bite.
What makes this dish special is the marriage of sweet, roasted bell pepper shells with a creamy, protein‑packed filling that’s lightly seasoned and topped with melty cheese. The result is a comforting, hearty bite that feels both indulgent and wholesome.
This recipe is perfect for busy families, brunch‑loving friends, or anyone who craves a nutritious start without spending hours in the kitchen. Serve it for a weekend brunch, a lazy Sunday breakfast, or even a festive holiday morning.
The process is straightforward: roast the peppers, whisk together a savory egg‑and‑cheese mixture, combine with veggies and optional ham, then bake until the filling sets and the cheese turns golden. In less than an hour you’ll have a colorful, satisfying plate ready to enjoy.
Why You'll Love This Recipe
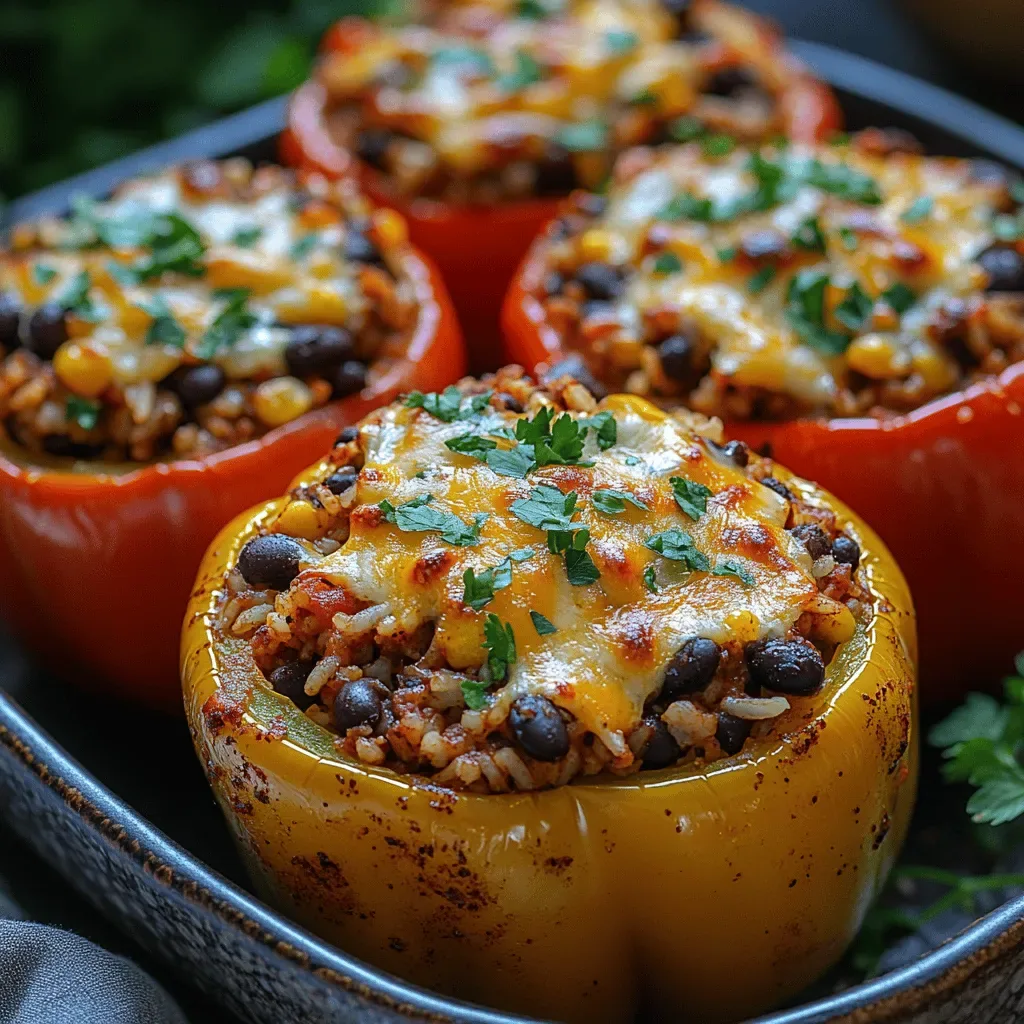
Bright & Cheery: The natural rainbow of red, orange, yellow and green peppers creates a plate that looks as joyful as the flavors taste, making every bite feel celebratory.
One‑Pan Simplicity: After a quick roast, the peppers and filling share the same baking dish, minimizing cleanup while still delivering restaurant‑quality presentation.
Protein‑Rich Start: Eggs, cheese and optional ham give a satisfying protein boost that keeps you full through the morning, perfect for busy brunch crowds.
Customizable & Healthy: Swap veggies, add herbs, or go vegetarian—this base adapts to any dietary need while staying nutrient‑dense and delicious.
Ingredients
For a brunch that feels both comforting and exciting, I rely on fresh, colorful peppers as the edible vessels. The filling leans on eggs and cheese for richness, while spinach and onion add moisture and nutrition. A touch of ham (or crisp bacon) brings smoky depth, and simple seasonings pull everything together. The result is a balanced bite that’s fluffy, cheesy, and bright in every forkful.
Main Ingredients
- 4 large bell peppers (any colors)
- 6 large eggs
- 1 cup shredded cheddar cheese
- ½ cup diced cooked ham (or crisp bacon)
Filling Base
- ¼ cup whole‑milk milk
- 1 cup fresh spinach, roughly chopped
- ½ small onion, finely diced
- 1 clove garlic, minced
Seasonings & Garnish
- ½ teaspoon kosher salt
- ¼ teaspoon freshly ground black pepper
- ¼ teaspoon smoked paprika
- 1 tablespoon olive oil
- 2 tablespoons fresh parsley, chopped (for garnish)
The synergy of these ingredients is what makes the dish sing. The peppers provide a sweet, slightly caramelized shell, while the egg‑cheese mixture creates a fluffy, custardy interior. Milk adds silkiness, spinach injects a burst of green nutrition, and the aromatics (onion, garlic, paprika) layer depth. A final sprinkle of parsley brightens the plate and adds a fresh herbal note that balances the richness.
Step-by-Step Instructions
Preparing the Peppers
Slice the tops off each bell pepper and carefully remove the seeds and membranes. Rinse the hollowed peppers, pat them dry, and set them upright in a baking dish. Drizzle the inside of each with a little olive oil, then place the dish on a baking sheet and roast at 375°F for 12‑15 minutes, until the walls are just tender. This pre‑roast prevents a soggy interior later.
Making the Filling
- Saute aromatics. Heat olive oil in a skillet over medium heat. Add diced onion and cook 3‑4 minutes until translucent, then stir in garlic and smoked paprika; cook another 30 seconds until fragrant. This step builds the flavor foundation for the custard.
- Wilt the spinach. Toss the chopped spinach into the skillet, stirring until just wilted, about 1 minute. Remove from heat and let cool slightly—this prevents the eggs from scrambling when combined.
- Blend the custard. In a large bowl whisk together eggs, milk, shredded cheddar, salt, and pepper until smooth. Fold in the sautéed onion‑garlic‑spinach mixture, diced ham, and an extra pinch of paprika for color.
- Season to taste. Taste the filling; adjust salt or pepper if needed. The mixture should be slightly thicker than pancake batter—it will set nicely inside the peppers.
Assembling & Baking
- Fill the peppers. Spoon the custard evenly into each roasted pepper, filling to the top but leaving a tiny gap for expansion. The peppers act as natural ramekins, holding the mixture in place.
- Cover & bake. Tent the baking dish with foil to keep moisture in, then bake at 375°F for 20 minutes. After 20 minutes, remove the foil and continue baking another 8‑10 minutes until the tops are golden and the custard is set (a knife inserted should come out clean).
- Rest briefly. Allow the stuffed peppers to rest for 5 minutes after removing from the oven. This short rest lets the interior finish setting and makes them easier to serve.
Finishing & Serving
Sprinkle each pepper with fresh parsley and an optional extra pinch of shredded cheese. Serve the peppers upright on a platter, allowing guests to pull off the tops and dig in. Pair with a simple mixed‑fruit salad or toasted sourdough for a complete brunch experience. The combination of creamy interior and sweet pepper shell delivers comfort with every bite.
Tips & Tricks
Perfecting the Recipe
Pre‑roast the peppers. Giving the peppers a head start ensures they stay tender and don’t become soggy once the custard is added.
Use room‑temperature eggs. Cold eggs can cause the custard to seize; letting them sit for 10 minutes yields a smoother texture.
Don’t over‑mix the filling. Gentle folding keeps the cheese from clumping and preserves a light, airy custard.
Check for doneness with a knife. The center should be firm but still slightly jiggle; a clean knife indicates perfect set.
Flavor Enhancements
Add a splash of lemon juice to the filling for bright acidity, or stir in a teaspoon of Dijon mustard for subtle tang. For a gentle heat, sprinkle a pinch of red‑pepper flakes into the custard before baking. Finish each pepper with a drizzle of extra‑virgin olive oil right before serving for a glossy finish.
Common Mistakes to Avoid
Skipping the resting period after baking leads to a runny interior; let the peppers sit so the custard fully sets. Also, avoid using too much liquid (extra milk or watery vegetables) because the filling may become soupy and won’t rise properly.
Pro Tips
Grate cheese fresh. Freshly grated cheddar melts more evenly and adds a superior stretch compared to pre‑shredded varieties.
Use a kitchen scale. Precise measurements for the eggs and cheese ensure consistent texture across batches.
Line the baking dish with parchment. This prevents the peppers from sticking and makes cleanup a breeze.
Serve immediately. The cheese crust softens as it cools; a hot plate guarantees the best contrast between creamy interior and crisp topping.
Variations
Ingredient Swaps
Switch the ham for crumbled sausage, chorizo, or smoked tofu for a vegetarian twist. Replace cheddar with feta or goat cheese for a tangier profile. Add diced tomatoes or roasted mushrooms to the filling for extra moisture and earthiness. Each swap maintains the core concept while tailoring the flavor to your pantry.
Dietary Adjustments
For a gluten‑free version, simply verify that any processed cheese or ham is certified gluten‑free. To go dairy‑free, use a plant‑based cheese alternative and substitute the milk with oat or almond milk. Keto diners can omit the milk and increase the cheese ratio, keeping carbs low while preserving richness.
Serving Suggestions
Pair the stuffed peppers with a light citrus‑yogurt dip, a side of quinoa salad, or toasted English muffins for a brunch spread. A simple arugula salad dressed with lemon vinaigrette adds peppery freshness, while a glass of chilled sparkling cider balances the richness of the cheese‑filled peppers.
Storage Info
Leftover Storage
Allow any leftovers to cool to room temperature, then transfer each pepper to an airtight container. Refrigerate for up to 3 days. For longer keeping, wrap each pepper tightly in plastic wrap, place in a freezer‑safe bag, and freeze for up to 2 months. Proper sealing prevents freezer burn and preserves flavor.
Reheating Instructions
Reheat refrigerated peppers in a 350°F oven, covered with foil, for 12‑15 minutes until warmed through. Remove the foil for the final 3 minutes to re‑crisp the cheese topping. In a microwave, heat on medium power for 1‑2 minutes, adding a splash of milk if the filling looks dry. Stir gently halfway through for even heating.
Frequently Asked Questions
This colorful, protein‑packed brunch dish brings together the sweet crunch of roasted peppers with a creamy, cheesy custard that’s both comforting and elegant. We’ve walked through ingredient selection, step‑by‑step assembly, storage, and plenty of variations so you can make it your own. Feel free to swap proteins, experiment with herbs, or adjust seasonings to match your taste. Serve it hot, share it with loved ones, and enjoy every vibrant bite of your homemade stuffed bell peppers.


